Introduction to VEX and Python#
What is VEX ?#
Expression language inside Houdini
General purpose
Multithreaded, performance similar to compiled C/C++
Not a replacement for Python
When to use VEX ?#
Manipulate geometry or particle
Extend or create new nodes
Where to use VEX ?#
SOPs
POPs
Mantra shading
CHOPs
COPs
Compilation#
VEX uses the vcc compiler
VEX code is stored in .vfl files
Compiled VEX is stored in .vex files
Sames as C++, where code is kept in .python files while compiled code can be kept in .exe files
Declaring Attributes#
Attributes are declared and called using the
@symbol before the identifier.Declaring an attribute involves specifying the type and the identifier.
Attributes don’t need to be defined in the code, only declared.
Attributes can’t be deleted in VEX.
Data types#
By default, the attribute type is a float.
Float:
f@attribInteger:
i@attribString:
s@attribVector2:
u@attribVector3:
v@attribVector4:
p@attribMatrix2:
2@attribMatrix3:
3@attribMatrix4:
4@attrib
Global variables#
The data type of an attribute only needs to be specified the first time it’s used in the wrangle
Afterwards, it can be called only using the @ without specifying type
@ptnum: current point number@numpt: total number of points@Time: current time in seconds@Frame: current frame@primnum: current primitive number@numprim: total number of primitives
Vectors#
Vectors are defined using curly brackets
{}.
v@my_vector = {0,0,0};
You can’t do any computation after the
=sign or have varying argumentsTo add a dynamic value use the
setfunction
v@my_vector = set(1, cross(@N, @up), 1)
Indexing / Elements / Components#
Individual components of a vector can be accessed using the subscript operator
[]and the index number inside.
v@attrib = {1,2,3};
@attrib[1];
Can also be accessed using the dot operator
..
v@up = {0,1,0};
@up.y;
The dot operator can be used with x,y,z,w or r,g,b,a.
@Cd = {1,0.5,0};
@Cd.g;
Common attributes#
Note
To get a list of all common attributes, create a point VOP node.
Declaration of an attribute#
@my_attrib;
Definition of an attribute#
@my_attrib = 10;
Note
The syntax follows this structure:
<Data type>@<Identifier>
Example:
i@wall_id;
Functions#
Group of statements that perform a task
Takes arguments
Can return a value
Variables#
Behave like variables in any other programming language
Local to the wrangle node (are destroyed after each wrangle)
Aren’t carried forward like attributes
Useful to store temporary information
Variables have a different namespace than attributes
This allows for attributes and variables to have the same identifiers. Not recommended to do this! Leads to confusion!
Variables need to be declared with the full data type
floatmy_varintmy_varvector2my_varvectormy_varvector4my_varmatrix2my_varmatrix3my_varmatrixmy_varstringmy_var
Like attributes, the data type is only declared the first time.
Pass by reference#
Different type of variable
Acts as an alias to other variables
Changing the value of a reference variable will also change the value of the variable it’s referencing
Some VEX functions have arguments that are passed by reference
Represented by an
&in the parameter name in the docsGives the function the access to change the passed variable
Useful when a function has to return multiple things of different data types
Conditionals#
If the expression evaluates to true (non 0), the if statement executes, if not the else statement executes.
if(@P.y > 0.5)
   @Cd = {1,0,0};
else
   @Cd = {0,0,1};
Multiple statements#
If statements only execute a single statement, to execute multiple statements you can use a block.
if(expression){
   statement;
   statement;
}
else{
   statement;
   statement;
}
Multiple conditions can be combined using and / or / && / ||.
Creating interface controls#
Parameters can be created as in VOPs using the following expressions:
Float parameter
ch("name")Integer parameter
chi("name")Vector parameter
chv("name")Ramp parameter
chramp("name")
float mult = ch("mult");
@P += @N * mult;
Examples#
##################################
float threshold = ch("threshold");

if(rand(@ptnum) < threshold) {
   @active = 1;
   @Cd = {1,0,0};
}

i@release = 240;
##################################
int prim;
vector uv;

xyzdist(1, @P, prim, uv);
@P = primuv(2, "P", prim, uv);
##################################
float radius = ch("radius");
int max_pts = ch("max_pts");

int handle = pcopen(1, "P", @P, radius, max_pts);
@active = pcfilter(handle, "active");
@Cd = pcfilter(handle, "Cd");
##################################
if(@active > 0.2) removepoint(0, @ptnum, 1);
##################################
float radius = ch("radius")*1;
int max_pts = chi("max_pts");
int handle = pcopen(1, "P", @P, radius, max_pts);

@active = pcfilter(handle, "active");
if (@active > ch("threshold")) @active = 1;
@Cd = set(1,1-@active,1-@active);

if (@active == 1) i@release = int(@Frame);
@release = min(@release, i@opinput01_release);
##################################
if(i@release != int(@Frame)) removepoint(0,@ptnum);
##################################
@v = @N * fit(rand(@ptnum + 231.1),ch("min_speed"),ch("max_speed"));
Structure of a For Loop#
For loops are used when the amount of iterations is known.
for(init statement; condition-expression; end expression) {statement;}
Run init statement
Evaluate condition 1. If
True, run statement 2. IfFalse,Exit(X)Execute expression
Evaluate condition (back to step 2)
for(int i=0; i<10; i++){
   statement;
}
Colinearity#
@N = normalize(point(1, "P", 1) - @P);

int pt = 2;
vector test_vector;
int max_pts = npoints(1) - 1;

float collinear_threshold = ch("collinear");

// debug
i@test = max_pts;

for(int i=pt; i< max_pts; i++)
{
   test_vector = normalize(point(1, "P", i) - @P);
   if(1 - abs(dot(@N, test_vector)) > collinear_threshold){
      @up = normalize(cross(@N, test_vector));
      i@pt = i;
      break;
   }
}
// Rest matrix
vector rest_N = point(1, "N", 0);
vector rest_up = point(1, "up", 0);
vector rest_P = point(1, "P", 0);

matrix rest_M = lookat({0,0,0}, rest_N, rest_up);
translate(rest_M, rest_P);

// Anim matrix
vector anim_N = point(2, "N", 0);
vector anim_up = point(2, "up", 0);
vector anim_P = point(2, "P", 0);

matrix anim_M = lookat({0,0,0}, anim_N, anim_up);
translate(anim_M, anim_P);

rest_M = invert(rest_M);
matrix M = rest_M * anim_M;

@P *= M;
HOM (Houdini Object Model)#
Houdini’s Python API
houmodule- Can be written in multiple places
Python SOPs
Python Object
Parameter Expressions
Digital Assets
Shelves
Python Shell
Python Source Editor
Object Oriented Programming#
- Objects instead of actions
Data and Functionality (fields and methods)
MyClass.nameMyClass.versionMyClass.createGeometry()MyClass.addPoint()Classes define a new type (
int,float,str,list,dict)Use
type()Objects created when calling
MyClass()are called instancesA class is just a blueprint, or definition for instances
Classes can inherit from others
Child classes inherit the fields and methods of their parent class
def __init__(self):
   super(SopNode, self).__init__()
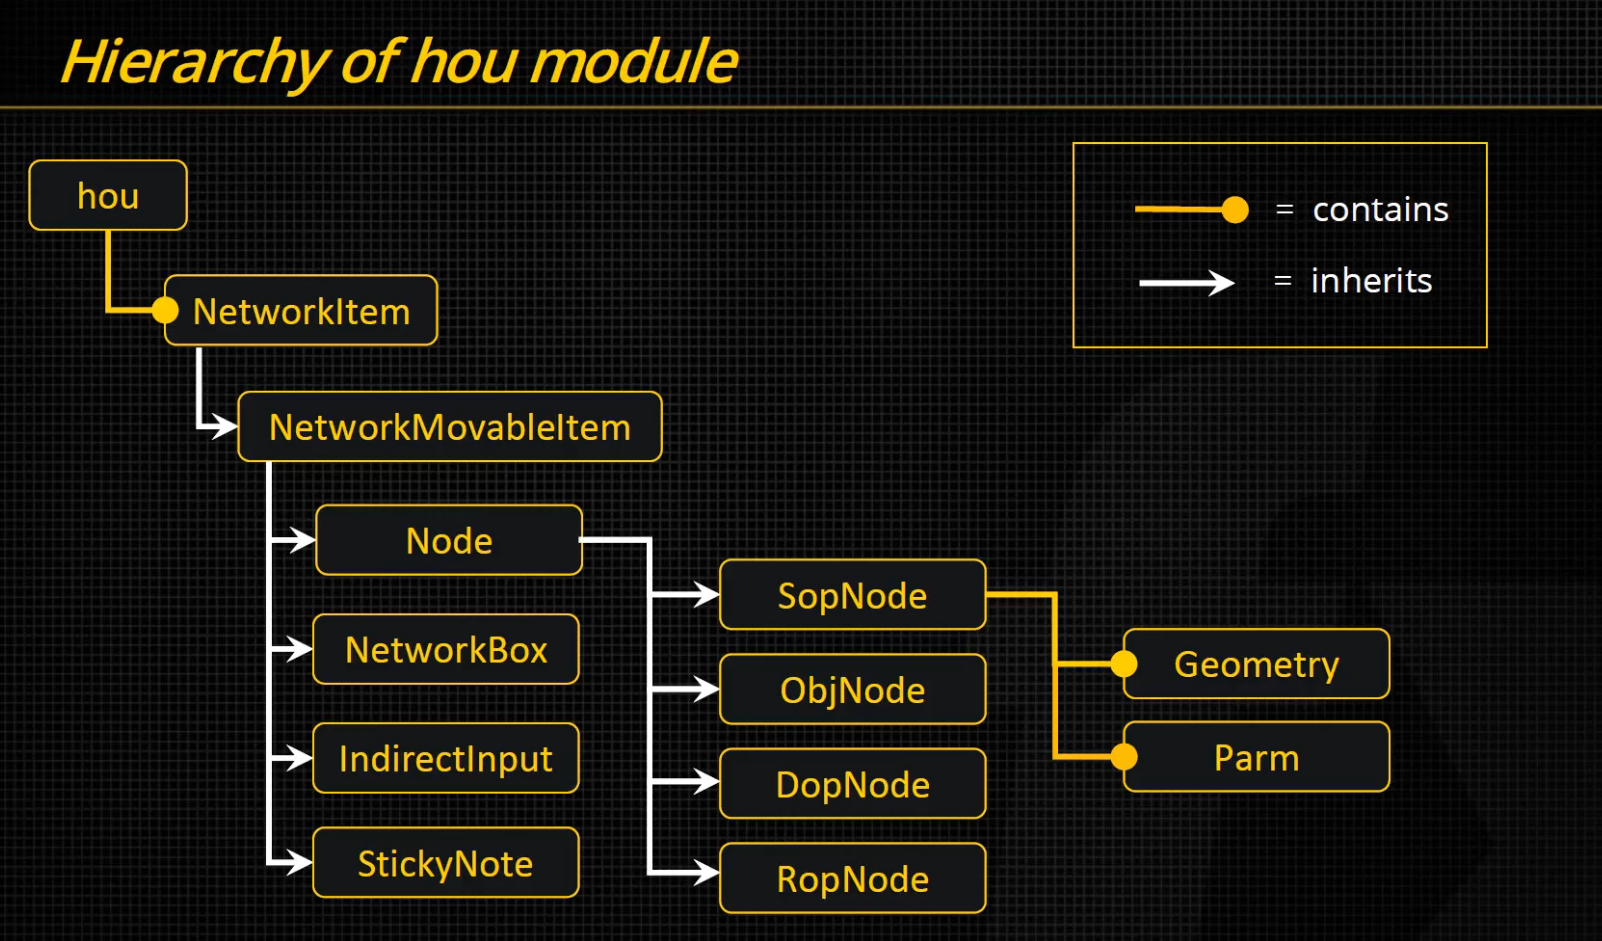
Hierarchy of hou module#
ObjNode Class#
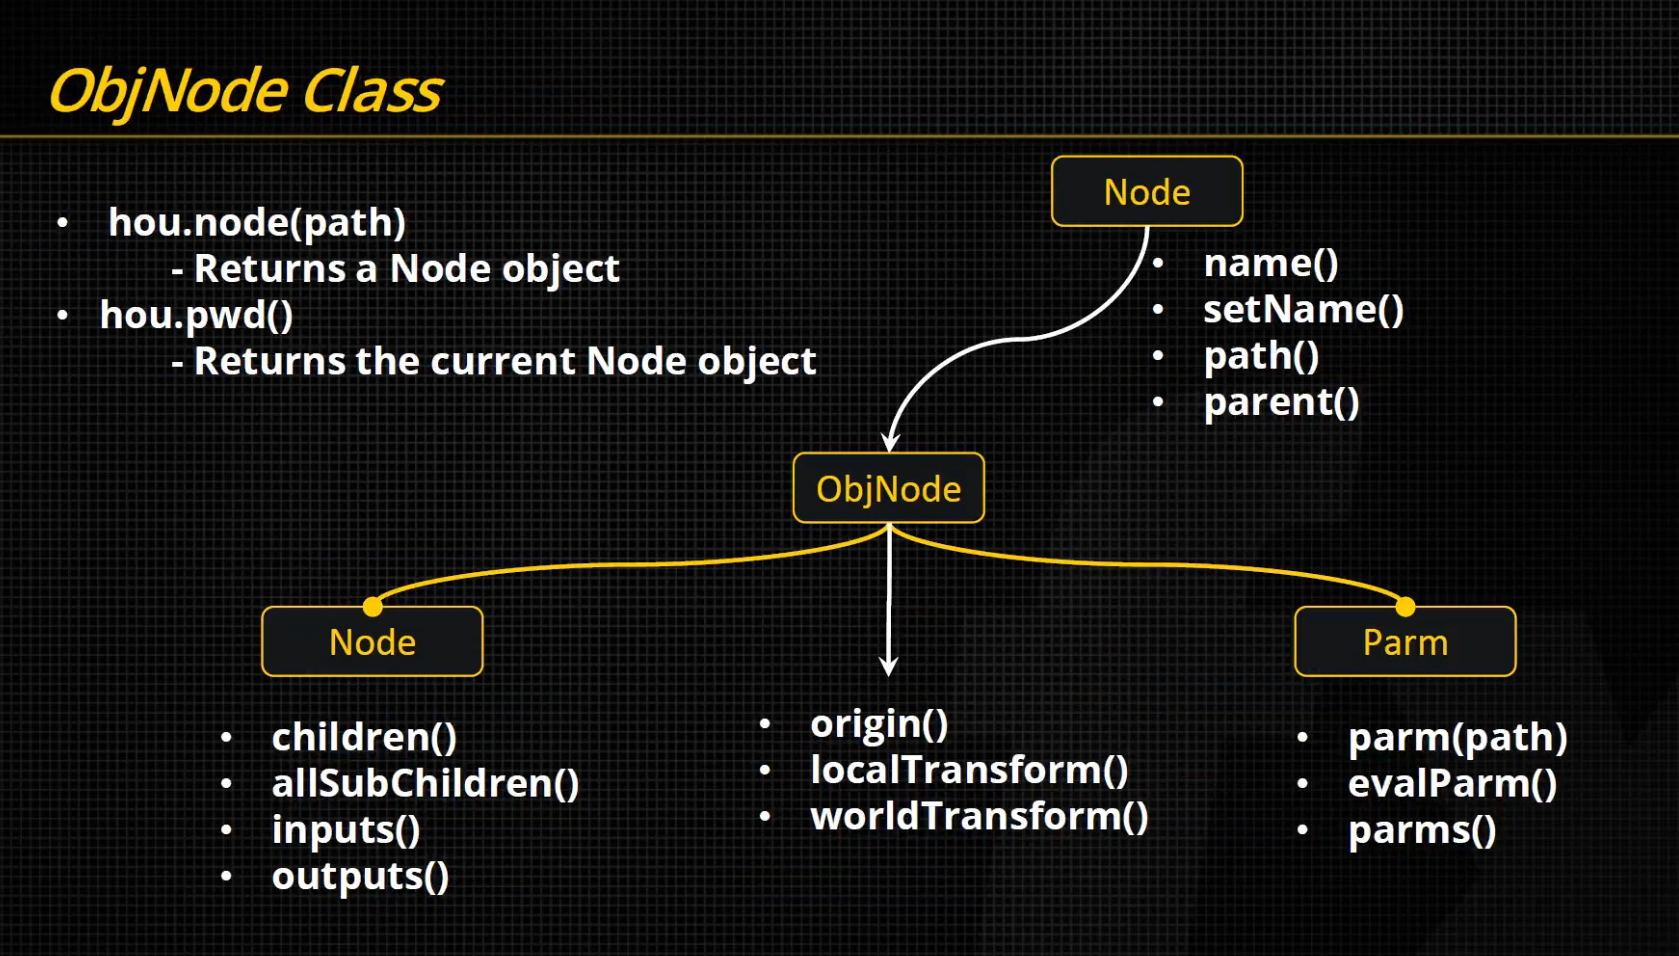
node = hou.node('/obj/geo1')

print ( node.name() )
print ( node.path() )
print ( node.children() )

child = node.children()[0]

print (type(child))

inputs = node.inputs()
print(type(input))

parm = node.parm('tx')
print(type(parm))
parmvalue1 = parm.eval()
parmvalue2 = node.evalParm("tx")
print(type(parmvalue1))
print(type(parmvalue2))

print(node.origin())
print(node.localTransform())
Parm Class#
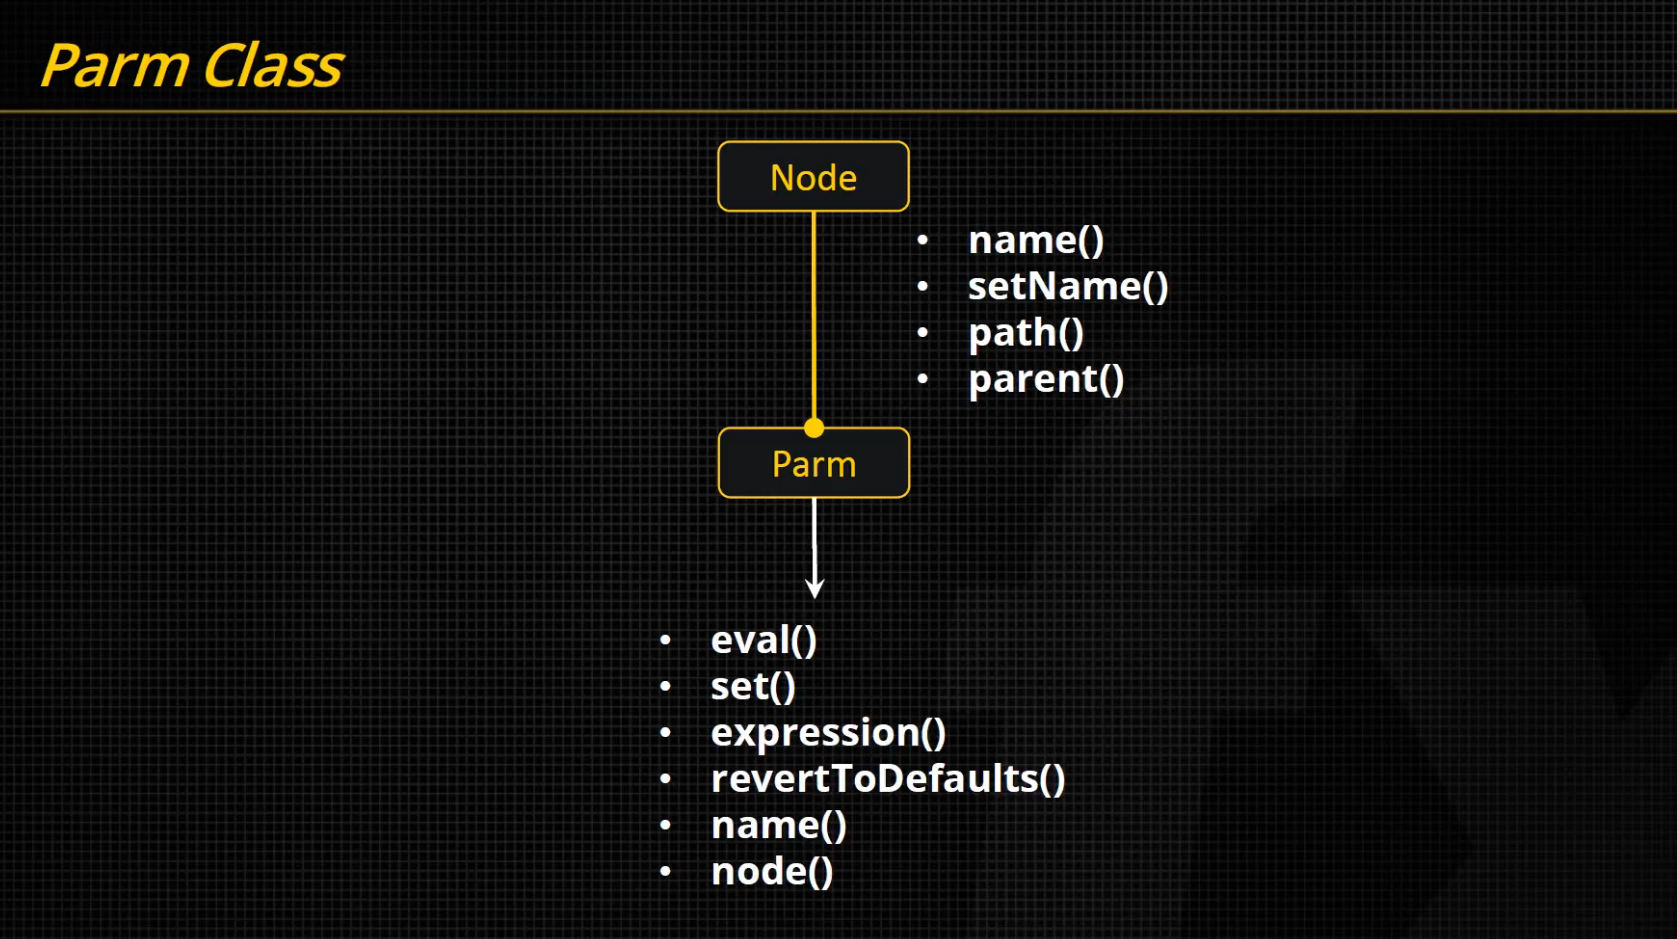
node = hou.node('/obj/geo1')

sop_node = node.children()[1]

print(type(sop_node))

print(sop_node.geometry())
print(sop_node.inputGeometry(0))

# PARM CLASS
parm = node.parm("tx")
parm.set(10)
print(parm.eval())

parm.revertToDefaults()
print(parm.eval())
print(parm.name())
print(parm.node())
Geometry Class#
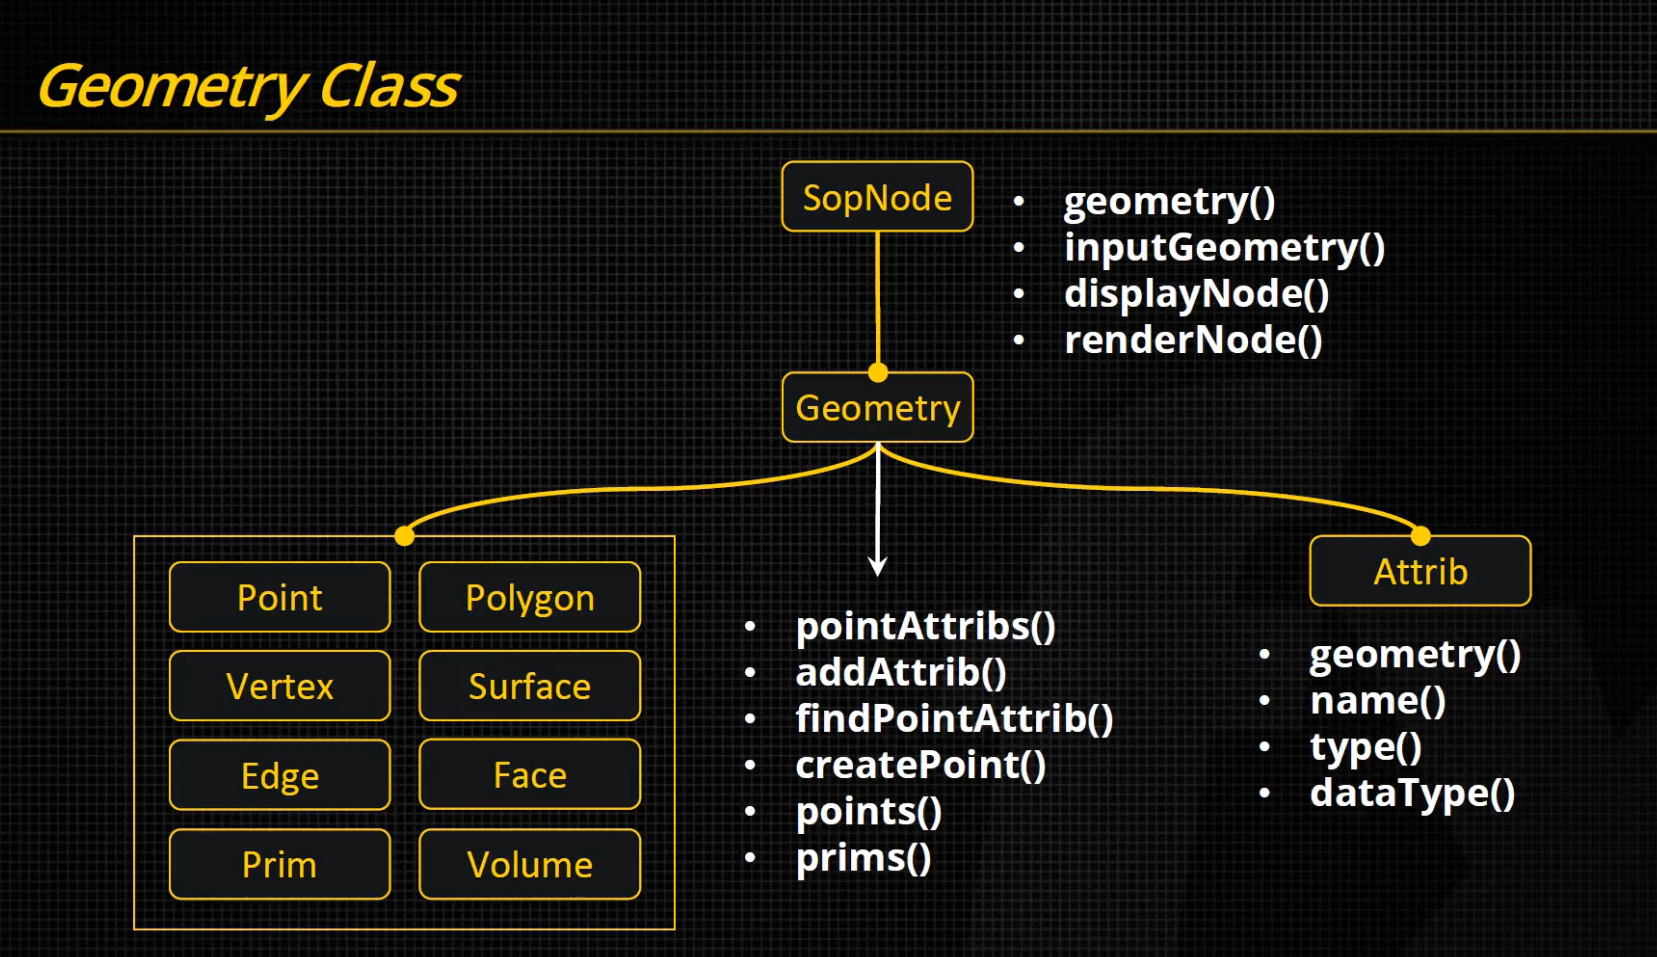
node = hou.node('/obj/geo1')
sop_node = node.children()[1]

# Geometry CLASS
geo = sop_node.geometry()
print(type(geo))
print(geo.pointAttribs())
print(geo.points())
Point Class#
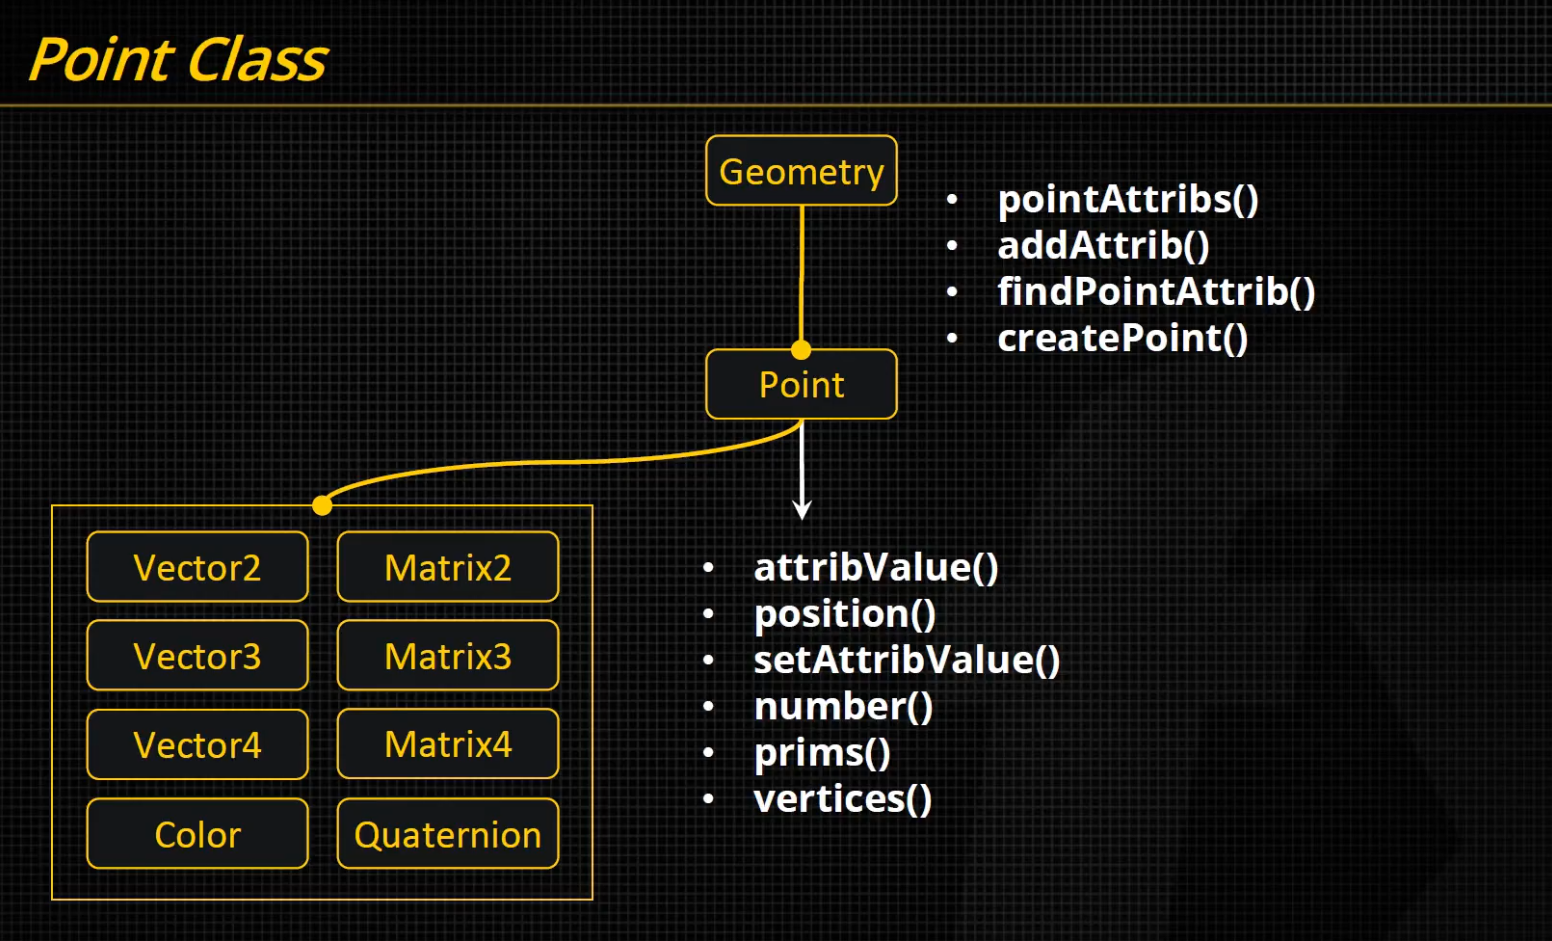
node = hou.node('/obj/geo1')
sop_node = node.children()[1]

# Geometry CLASS
geo = sop_node.geometry()
print(type(geo))
geo.pointAttribs()
pt = geo.points()[0]
print(type(pt))
# Point Class
print(pt.position())
print(pt.number())
print(pt.prims())
Vector3 Class#
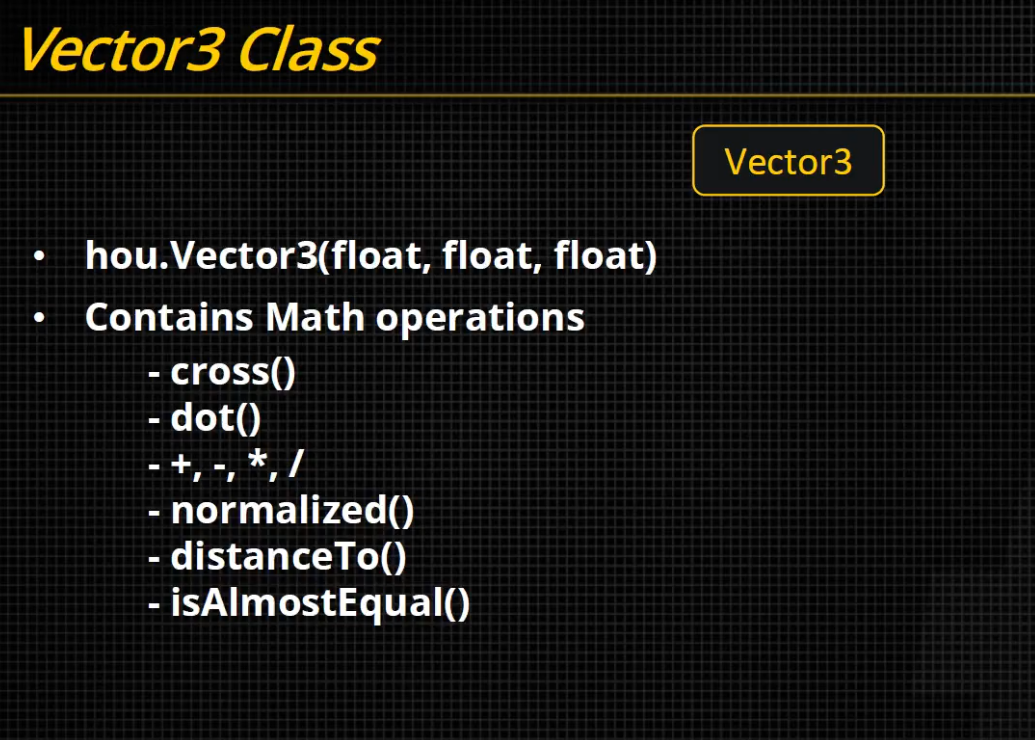
node = hou.pwd()
geo = node.geometry()

pt = geo.points()[0]
pt.setPosition(hou.Vector3(1,2,3))
How attributes work#
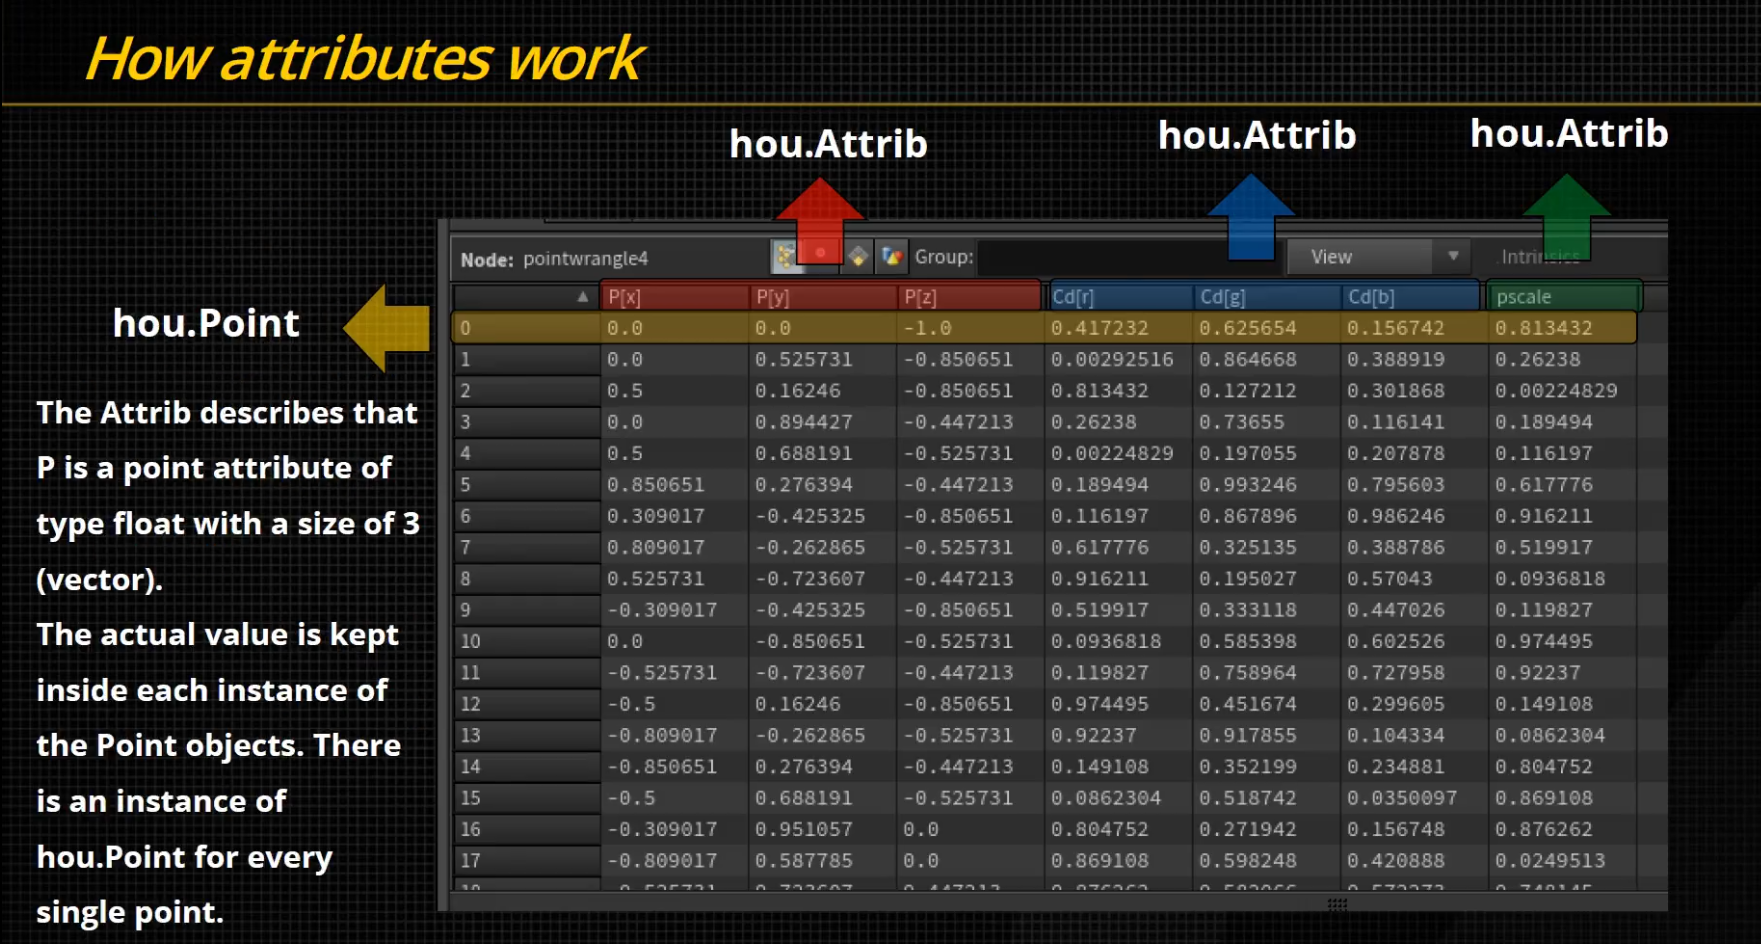
- Attrib class doesn’t store values
Only describes data type and element
The values are stored in the
Point,Prim,Vertexetc.Use
findPointAttribto return theAttribobjectPointattribValue(hou.Attrib)attribValue(str)Name of the attribute
node = hou.pwd()
geo = node.geometry()

pt = geo.points()[0]
pt.setPosition(hou.Vector3(1,2,3))
# method 1
attrib = geo.addAttrib(hou.attribType.Point, "pscale", 0.0)
print(type(attrib))

pt_8 = geo.points()[8]
print(pt_8.number())
print(pt_8.attribValue(attrib))
# method2
attrib = geo.findPointAttrib("pscale")
print(type(attrib))
print(pt_8.attribValue("pscale"))
Read .csv file#
import csv
node = hou.pwd()
geo = node.geometry()
path = node.evalParm('file')
x_index = 0
y_index = 1
pop_index = 8
geo.addAttrib(hou.attribType.Point, "population", 0)

with open(path) as f:
   reader = csv.reader(f)
   for i, row in enumerate(reader):
      if i ==0:
            continue # header
      pt = geo.createPoint()
      x = float(row[x_index])
      z = float(row[y_index])
      pop = int(row[pop_index])

      pt.setPosition(hou.Vector3(x,0,z))
      pt.setAttribValue('population', pop)

      # in a python wrangle node
      i@population = clamp(@population, 0, detail(0, "max_population"));
      @fit_population = fit(@population, 0, detail(0, "avg_population"), 0 , 1);
      @intensity = fit01(@fit_population, ch("min_intensity"), ch("max_intensity"))
      @Cd = @fit_population;
      @Cd = chramp("light_color", @fit_population);